I learned the hard way about iPhone RAW photography. Two years ago, I shot an entire family event in ProRAW mode. 300 photos. 22 gigabytes. I ran out of storage mid-dinner. The worst part? Most of those shots did not need RAW at all.
A simple JPEG would have worked fine. That mistake cost me time, storage, and a bit of sanity. This guide saves you from my errors. You will learn exactly when to shoot RAW, how to set it up, and which editing apps actually deliver results.
iPhone RAW Photography: What It Actually Means?
Most iPhone users never think about file formats. You open the Camera app. You tap the shutter. The phone does the rest.
But here is what happens behind the scenes. Your iPhone processes every photo before you see it. It reduces noise. Adds sharpening. Fixes white balance. It turns sensor data into a beautiful, shareable image.
Read Also: How to Customize iPhone 17 Pro Camera Control for Faster Shooting?
That processed image is a JPEG or HEIF. Small file. Ready to post. Works great 90% of the time.
iPhone RAW photography skips all that processing. You get the raw sensor data. Nothing added. Nothing removed. A digital negative, essentially.
The trade-off is simple. More control equals more work. More data equals more storage.
Apple ProRAW: The Best of Both Worlds
Apple introduced ProRAW with the iPhone 12 Pro. It is not pure RAW. It is Apple's hybrid format. ProRAW combines unprocessed sensor data with Apple's computational photography. You get Deep Fusion. You get Smart HDR. You also get full editing flexibility.
Standard RAW files look flat right out of camera. ProRAW files look better because Apple already applied some magic. But you can still push exposure, white balance, and color in ways JPEG never allows.
ProRAW is available on: iPhone 14 Pro and newer Pro models. Also on iPhone 15 Pro, iPhone 16 Pro, and iPhone 17 Pro series.
Not on standard iPhones. Not on older Pro models before the 12.
How to Take RAW Photos on iPhone 16?
Let me walk you through the exact steps. Takes 30 seconds.
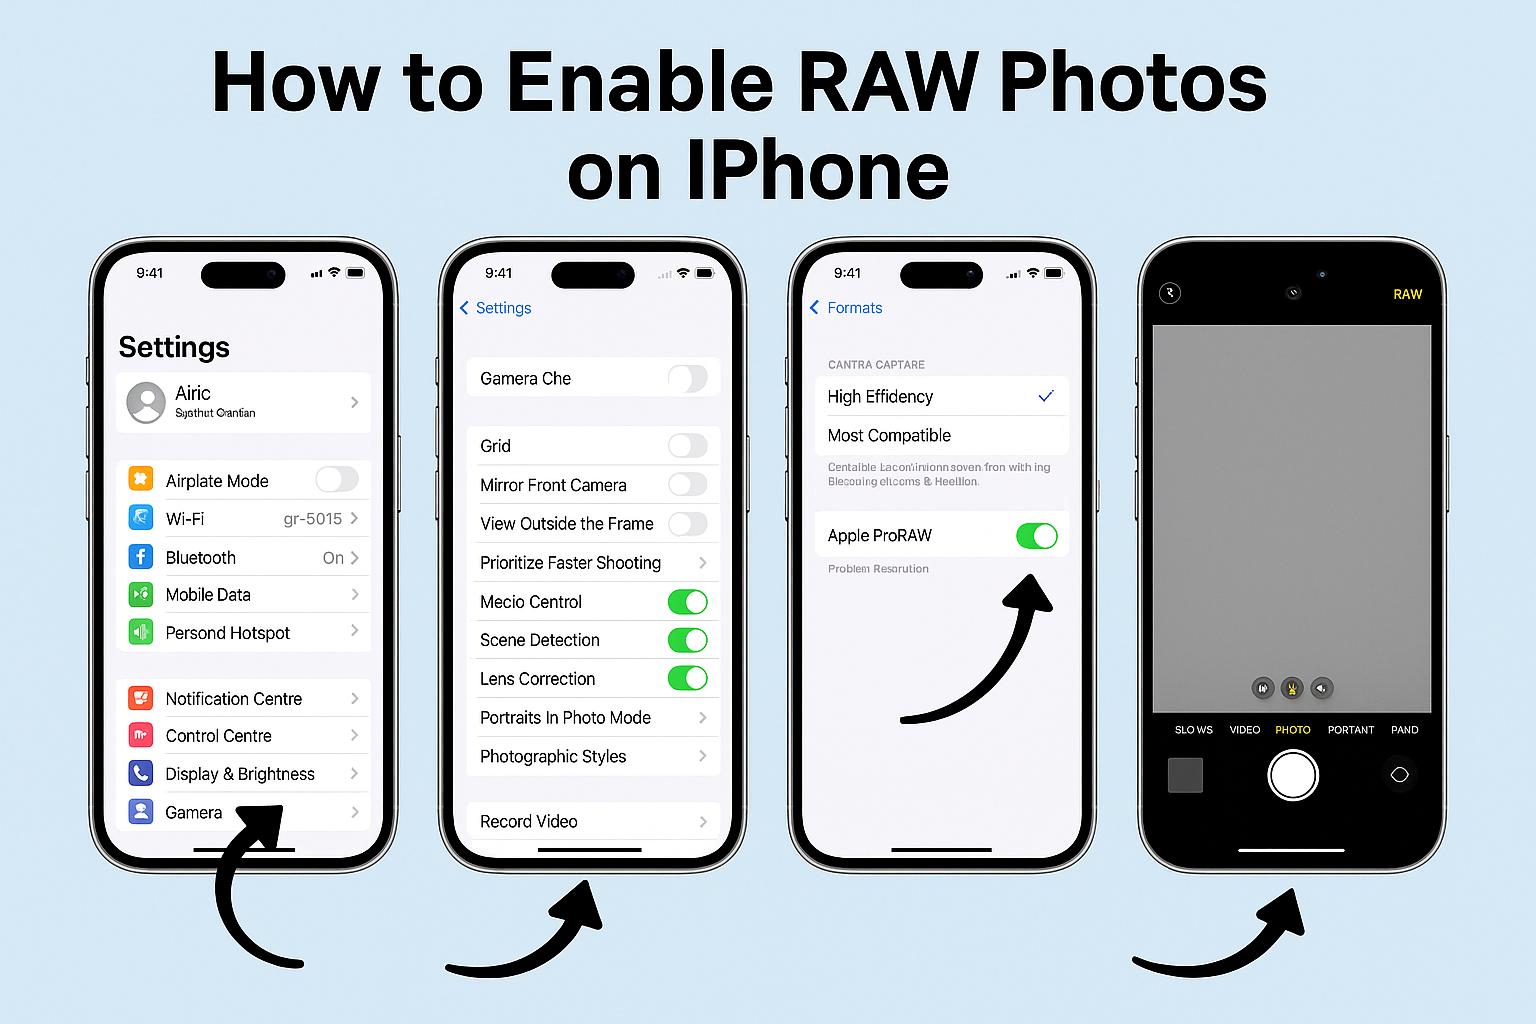
Step 1: Open Settings > Camera > Formats.
Step 2: Turn on "Apple ProRAW" or "ProRAW & Resolution Control" (name depends on your iOS version).
Step 3: Choose your default resolution. You have options. 12MP ProRAW gives you 25MB files. 48MP ProRAW gives you 75MB files. HEIF 48MP is also available on newer models.
Step 4: Open the Camera app. Look at the top right corner. You will see "RAW" or "RAW 12" or "RAW 48". If it has a line through it, you are still shooting JPEG.
Step 5: Tap that button once. The line disappears. Now you are shooting RAW.
Step 6: Take your photo.
Step 7: Tap the RAW button again to turn it off. Do not forget this step. I forget it all the time. Then I end up with 75MB photos of my coffee mug.
Scott Kelby, the famous photography instructor, shares this exact workflow. He leaves RAW off by default. He turns it on only for shots that really matter. Then he turns it right back off.
75MB Is No Joke. Here Is Why That Matters?
Let me put those file sizes in perspective.
-
Standard JPEG or HEIF from iPhone: ~1-2MB
-
12MP ProRAW: ~25MB
-
48MP ProRAW: ~75MB
Shoot 14 photos in 48MP ProRAW. That is over 1 gigabyte. Do a quick burst of 50 photos. You just used 3.75GB.
Scott Kelby tells a great story about this. He reminds us that the Nikon D3, a $5,000 professional camera body in 2009, shot at 12.1 megapixels. That camera produced images used in global ad campaigns. Printed at massive sizes.
His point? 12 megapixels is plenty for almost everyone.
So unless you are printing billboards or cropping to 1% of your image, 12MP ProRAW works perfectly. Save 48MP for those rare shots you know you will want to print large.
RAW Camera Settings iPhone: Resolution Options
Your RAW camera settings iPhone choices depend on your phone model.
iPhone 14 Pro, 15 Pro, 16 Pro, 17 Pro owners: You can choose between 12MP ProRAW and 48MP ProRAW. Go to Settings > Camera > Formats > ProRAW Format.
You Must Also Like: How to Record ProRes RAW on iPhone 17 with External SSD?
iPhone 12 Pro and 13 Pro: You only get 12MP ProRAW. That is fine. It still gives you plenty of editing room.
Non-Pro iPhones: You cannot shoot ProRAW in the native Camera app. But you have options. More on that below.
No ProRAW on Your iPhone? Here Is the Workaround
If your iPhone does not support ProRAW, do not worry. You can still shoot RAW.
Download Adobe Lightroom Mobile. It is free. Open the app. Tap the top where it says "JPEG". A file format menu appears. Choose "DNG".
DNG is Adobe's open-source RAW format. Lightroom Mobile lets you shoot it even on older iPhones. The quality is excellent. The controls are manual. You adjust ISO, shutter speed, focus, and white balance yourself.
The only catch? You cannot use the native Camera app. You must shoot inside Lightroom. But that is a small price for RAW capabilities on any iPhone.
Best iPhone Camera Apps for RAW Photography
The native Camera app works fine for ProRAW. But third-party apps give you more control. Way more.
Halide is the top pick for 2026. It costs 9.99/month,9.99/month,19.99/year, or $60 for lifetime access. You get focus peaking. You get a live histogram. You get manual controls for everything.
Most importantly, Halide offers "Process Zero" mode. This bypasses ALL Apple processing. No noise reduction. No sharpening. No HDR. Just pure sensor data. It is as close to a traditional DSLR RAW file as you can get on an iPhone.
Obscura is another strong option. Lower price point. Clean interface. Good for learning manual photography.
Both apps support ProRAW and standard RAW. Both give you tools the native Camera app hides.
iPhone RAW Photography Software: Best Editing Apps
Shooting RAW is only half the battle. Editing RAW is where the magic happens.
Snapseed: Best Free Option
Google's Snapseed is completely free. No ads. No watermarks. No paywalled features. It handles RAW files easily. The toolset includes selective adjustments, curves, healing brush, HDR scape, and perspective correction.
You can save custom "Looks" and apply them to new photos instantly. For quick, high-quality edits without spending money, Snapseed wins.
Adobe Lightroom: Best for Serious Edits
Lightroom's free tier is genuinely useful. You get AI-powered Quick Actions. You get Adaptive Presets. You get Generative Remove for erasing unwanted objects. You get batch editing across multiple photos.
The paid tier ($4.99/month) unlocks more AI features. But the free version already handles RAW editing better than most paid apps.
What makes Lightroom special? The RAW controls are deep. You can push exposure up to 5 stops without breaking the image. You can recover shadow detail that looks completely black on screen. That is the power of RAW combined with Lightroom's engine.
Darkroom: Best for iOS Integration
Darkroom works seamlessly with the iOS Photos app. You edit a ProRAW photo in Darkroom, and it saves back to your camera roll. No import/export headaches. The curve tool is excellent. The color grading controls are professional-grade.
Apple's own App Store story recommends Darkroom specifically for RAW editing.
How to Edit a RAW Photo: The Workflow
Let me walk you through editing a RAW photo from start to finish. I use Lightroom for this example, but the principles apply everywhere.
Step 1: Open your RAW or ProRAW file in your editing app.
Step 2: Look at the image. It will look flat compared to a JPEG. Less contrast. Less saturation. That is normal. Do not panic.
Step 3: Adjust exposure first. RAW files hold more highlight and shadow detail than JPEGs. You can brighten dark areas without introducing noise. You can darken bright skies without losing cloud detail.
Step 4: Fix white balance. This is where RAW truly shines. JPEG photos lock in white balance at capture. RAW photos let you change temperature and tint after the fact. Mixed lighting situations? No problem. You can balance warm indoor lights with cool window light perfectly.
Step 5: Add contrast and clarity. RAW images lack the punch of processed JPEGs. You need to add it back. Use the contrast slider. Use the clarity or texture slider for mid-tone detail.
Step 6: Adjust saturation or vibrance carefully. RAW captures more color data than JPEG. You can push colors further before they break. But subtlety wins.
Step 7: Apply sharpening. RAW images have no in-camera sharpening. Add it yourself. But be gentle. Too much sharpening looks artificial.
Step 8: Save and export. Done.
The whole process takes 1-2 minutes once you learn it.
When to Shoot RAW (And When to Absolutely Not)?
Let me save you storage space and editing time.
Shoot RAW when:
-
You are shooting in difficult light (high contrast scenes, mixed lighting)
-
You plan to print the image large
-
You want creative control over black and white conversions
-
You are shooting something you cannot reshoot (travel, events, family moments)
-
You intend to spend time editing
Do NOT shoot RAW when:
-
You are taking quick snapshots for social media
-
You are running low on iPhone storage
-
You are shooting hundreds of photos (sports events, parties)
-
You do not plan to edit
-
The lighting is perfect and simple
Scott Kelby gives the best advice. Leave RAW off by default. Turn it on for specific shots that look special. Take the shot. Turn it off immediately. This workflow balances quality and practicality.
Common RAW Photography Mistakes (I Made All of These)
Mistake 1: Forgetting to turn RAW off. My 22GB family event proved this hurts. Set a mental reminder. Better yet, use the "Preserve Settings" option in Camera settings to remember your last mode. Or don't. I keep it off so I start fresh each time.
Mistake 2: Not editing RAW images. Some people shoot RAW and post the flat, unedited version. That defeats the entire purpose. A RAW image is raw material. Not a finished product.
Mistake 3: Over-editing. Just because you can push sliders to extremes does not mean you should. Subtle edits look natural. Heavy edits look like filters.
Mistake 4: Shooting 48MP for everything. 75MB per photo adds up fast. Unless you need that resolution, stick with 12MP ProRAW.
Mistake 5: Ignoring composition because "I can fix it in post." No amount of RAW data fixes a badly composed photo. Get it right in camera first.
My Personal RAW Photography Routine
Here is exactly what I do now. Copy it if it helps.
Default setting: JPEG/HEIC in the native Camera app. 95% of my photos live here.
When I see a great scene: I tap the RAW button. I take 1-3 shots. I tap the RAW button again to turn it off.
Editing: I import to Lightroom Mobile. I adjust exposure, white balance, and contrast. I add minimal sharpening. I export. Usually takes 90 seconds per photo.
For important shoots: I switch to Halide. I use Process Zero mode. I get pure sensor data. I edit in Lightroom. Takes longer. Looks better.
Storage management: I review my RAW shots weekly. I delete the bad ones immediately. I export edited finals to my computer. I clear them from my phone.
This routine keeps my storage under control. It gives me RAW flexibility when I need it. And it prevents me from drowning in 75MB files of nothing special.
The Final Thoughts
Is iPhone RAW Photography Worth It?
Yes. But only if you edit.
RAW is not magic. It will not make your bad photos good. It will make your good photos great. The extra dynamic range saves shots with blown highlights or blocked shadows. The white balance flexibility fixes mixed lighting.
The detail retention allows bigger prints and heavier crops. But RAW requires work. Every single RAW photo needs editing. That is the deal. You trade convenience for control.
If you enjoy editing, RAW is a joy. If you want share-ready photos straight from camera, stick with JPEG. I shoot both. RAW for the keepers. JPEG for everything else. That balance works for me. Find what works for you.
This article provides comprehensive insights about The Complete iPhone RAW Photography Guide: Shooting And Editing Like a Pro. Bookmark this page for future reference!